Baking · Dessert

Sweet little bites of Spring 💚 Lemon Thyme Shortbread.

Growing up, I never got the deal with shortbread. I always went for something multicolored or chocolatey. Thought shortbread just seemed a bit dull. But as I’m getting older (I’m sure one day I’ll also get wiser) I appreciate the sweet elegant simplicity of shortbread. That crispy crunchy melt in mouth combination, I have to confess. I’m now completely hooked. I love how easy it is to throw together too. And it always goes down a treat at coffee morning with the girls 💚

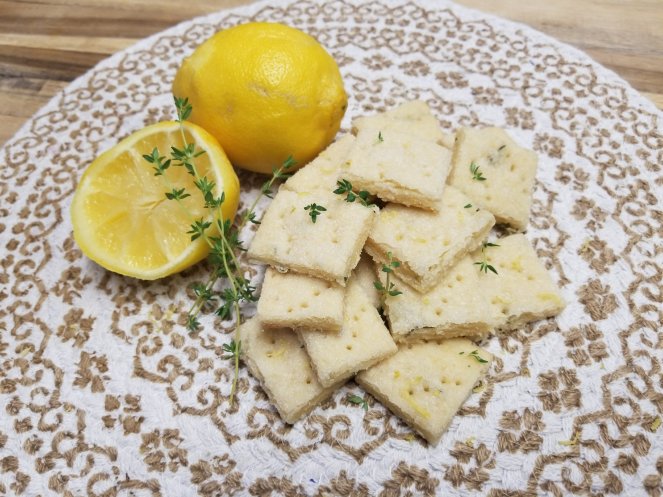
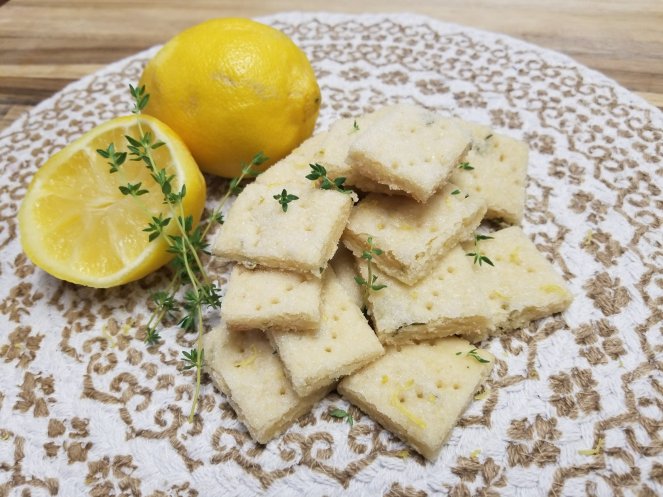
I love lemon and thyme as a flavour combination. The two are a match made in heaven. This perfectly simple, yet perfectly stunning little recipe is a good one to have at hand. And seems to tie perfectly with sunny days and spring time.

Any excuse to get me out and in to the herb garden. Those around me know I’m happiest with dirty feet and grubby knees. Thyme loves the spring and I adore the little flowers it gives.

This is my basic shortbead recipe, but I do tend to mix other flavours with different season. A few others to try are Lemon and Lavender or Orange drizzled with dark chocolate.

Recipe :

1/2 Cup Earth Balance softened

1/4 Cup Organic granulated Sugar

1 Tbs Icing Sugar (confectioners)

1Tbs Fresh Thyme

Zest of 1 Large Lemon

1tbs Lemon Juice

1/2 Tsp Salt

1 Cup Flour

1 Tbs Cornflour (corn starch)

More sugar for dusting.

Preheat oven to 350°.

Pop soft Earthbalance into a bowl and beat in the two sugars. Add the Thyme , lemon zest, lemon juice and salt and beat again. Sift the flour and corn flour together and slowly incorporate the flour into the butter mixture in two or three goes.

When it all comes to a dough pop between two sheets of baking paper or parchment and roll to about 1/4″ thick.

Transfer parchment onto a baking sheet and score into the shapes you like. I usually go with squares or rectangles. At this point give the shortbread a good dusting with granulated sugar.

Pop them into the oven for 12-15 minutes. Until golden around the edges. Leave to cool a little before cutting again and leave to cool compelelety before serving.

Breakfast · Dessert · In the Garden · Lunch

Spring is officially under way 🍑 Peach and Blueberry Season and the many things we love to make with them.

I love spring 💚 I love when everything starts to shoot up. The garden looks beautiful, flowers popping with colour, herbs are enormous and the Peach tree is in bloom. Not much more could make me happier. Until I discovered all of this on a much grander scale.

One of the best parts of living over in Clermont is being surrounded by the various farms, orchards and groves we have here. Every where you turn you can spot citrus groves here. But two of the lesser know orchards near me grow Blueberries and Peaches. And oh how stunning they are.

Honestly. I could wander round these farms all day snapping various photos. And the fruit is second to none. April and May are the season for them, and I like to go a few times to stock up.

The peaches here are a much smaller variety, but they hold their own on flavour. Love wandering around with my little bucket picking to my hearts content. If you’ve never been fruit picking or been to a real orchard I’d highly recommend. Its surprisingly therapeutic.

Having filled our little buckets off home for some delicious snacks for the week.

If you’ve been reading a while you’ll know my obsession with cooking things together that have the same growing season. That age old saying of “if it grows together it goes together” does ring true. And Peach and blueberries are a little match made in heaven.

And here are some ideas I’ve put together over the years with this beautiful flavour combination.

https://thelittlebluegarden.com/2017/08/21/lazy-sunday-night-in-at-its-best-💛-peach-and-blueberry-crumble/

And let’s not forget our breakfast options either :

https://thelittlebluegarden.com/2016/05/23/seriously-seedy-grain-free-porridge/

Or more recently some smoothie options 💛

I adore this smoothie. And it’s been my goto lunch lately. Love a quick blast from a blender and lunch being served.

This recipe makes 2 smoothie bowls.

Recipe :

4 Little Peaches

2 Bananas

1 Cup Frozen Mango

Almond milk

Add everything to the blender and almond milk to desired consistency, I like smoothies thicker in a bowl but thinner in a glass. Go figure that one out…

Top happily with a good handful of blueberries and granola and any seeds you’d like 💛

Don’t forget our Peach and Blueberry Pie recipe on page 70 of the book.

I hope you’re enjoying spring and all of the flavours it brings as much as I am.

Sending you love from The Little Blue Garden.

Enjoy !!

Baking · Dessert

❤Sunday Baking Valentine’s Style ❤ 🌹 Cherry Almond and Rose Sticky Buns 🌹

Ok. Confession. The amount of times I tried to take photos of this recipe may be a little embarrassing… but nothing I did seemed to show it well. So a few billion shots and a few choice words later I gave up and used the first one I took. What can I say? I chose the blog life. The blog life did not choose me….

Anyway.. back to what I’m supposed to be wittering on talking about.

Valentine’s ❤ or Galentine’s or whatever it is you feel like celebrating… I’m not precious, you do you. But I do advise you do it with sticky buns.. because life’s just a little better when it’s served something sweet and sticky. Or maybe that’s just me ??

Besides, I always love the idea of making something to show you care. A little time and effort can mean the world. Specially on these commercially vamped up holidays. Take some time, make it with love instead. I will admit. These buns take a little love and some patience as it needs to prove twice. Not that it’s hard work, but it’s not a quick snap recipe.. but they seemed worth the wait to me ❤

It’s no secret in my house my love of all things almond. My two childhood favourites (childhood? Who am I kidding) were always Cherry Bakewells and Battenburg Cake. And you’ll find me eating my own bodyweight in Marzipan over the holidays too. I have to admit. This relationship has been going on decades now.. I think… I think it must be love ❤ and so that was very much the flavour I wanted to run with. And so.. my Cherry Almond Sticky buns were born.

These really are one of those special occasion treats. They’re sticky and rich and everything I love about a sweet treat. The cherry jam pairs well with the rose scented frosting and almond dough. I hope you like them as much as I did.

Happy Valentines Day ❤

Recipe:

Dough

1 Cup Almond milk

1 tsp Almond extract

1 Packet Dry Active Yeast

1tsp + 2 Tbs Sugar

3 Cups flour

3 Tbs oil

1/4 Cup Diced Cherries

Filling:

1/4 Cup Cherry Jam

Frosting:

1 1/2 Cups Powedered Sugar

1 Tbs Earth balance (melted)

1tsp Rose Water

Splash Almond Milk, so its liquid enough to spread.

To decorate : edible rose petals

To start gently heat almond milk to luke warm. Sprinkle in yeast and 1tsp sugar. Give a good mix and leave to get activated and frothy for 5-10 minutes.

Meanwhile add flour, and remaining sugar to a stand mixer. If you haven’t got a stand mixer you’ll need to knead the dough for a while until the dough is springy once you’ve made it)

Add milk to flour, and then add in oil an almond extract and mix until a dough is formed. Once ready pop to one side in a warm dry area for an hour or two or until dough has doubled in size.

At this point removed the dough, squish the air out then knead in chopped cherries. Leave the dough to rest and rise a little again for an hour or so.

Once dough is ready, roll out to a large rectangle and spread with cherry jam. Roll up and slice. If you need more instructions on this check out my blueberry lemon rolls recipe. https://thelittlebluegarden.com/2016/03/13/blueberry-and-lemon-swirls/

Pop into a silicone mold or well greased baking tray. Then leave again for a little while till the oven preheats to 375°.

Bake for 15-20 minutes or until puffed up and baked through.

Leave to cool slightly before inverting, but do it whilst it’s still warm for best results.

Mix all the frosting ingredients together. If you’re eating this straight away, pour all over and enjoy when cool enough to handle, but still a little warm, if not then leave to cool completely before frosting ❤

I’d love you to believe that was the total amount of frosting used …

Sprinkle with rose petals and enjoy !!

Baking · Dessert

A taste of home 🇬🇧. Cornflake Tart. Northern and proud ❤ 

After spotting a conversation on social media the other day about school meals and desserts someone mentioned Cornflake Tart, and that was it. The only thing I could focus on for the rest of the day was replicating it. Work ? Yeah. That didn’t get done. This is pretty much the only fond memory of Primary school food that I can think of to be honest. The reconstituted mashed potato served with an Ice cream scoop is not quite day dream worthy…. 

So that day off into the kitchen I went. To remake this mini nostaligic masterpiece. Have to say I cheated with some pre made vegan pastry (judge me if you may).  And the rest really was childs play. Once it was ready, and my vanilla sauce was on the hob ( we had it with custard traditionally at school). I was feeling pretty smug and naturally started snapping photos and sending them to a load of other Brits out here. When it happened…. Non of them knew what it was or what I was on about ?!? I couldn’t believe it. I thought it was a British thing. Then a Northern thing? Nope. Maybe it was only served in the collieries ? What was wrong with all of these other peoples childhoods?! After another social media post it appeared my immediate school area at home knew, and some of the nearby towns. But every one else seemed rather perplexed by the whole thing…. so here to break the mystery a little. Is my very own version of a Cornflake Tart. 

This sweet sticky deliciousness is rich and cloying in that more-ish childish way. A little goes along way. Unless you’re me and just eat until you get a sugar headache. This a once in a while treat kind of dish. But if you fancy it more often… I won’t tell if you don’t. 

Don’t knock until you try it. Seriously. 

Would I ever lead you astray ?  

Recipe : 

1 pie crust 

1/3 Cup Treacle  / golden syrup 

1/4 Cup Earth Balance 

2 Tbs Brown Sugar

3 Cups Cornflakes 

1/2 Tsp Salt

1 Cup Stawberry Jam 

 I made my tart in a deep square baking dish. 7×7 but this recipe would make a 9″ no worries. I had more Cornflake mix over I made onto little nests after aswell…

Bake the crust according to pack instructions, preferably with baking beans or something to bring out a nice flat crust with high sides. As this bakes start your Cornflake mix. 

Melt earthbalance and treacle and sugar until it’s one delicious sugary sweet harmonious mix. Dont boil. Pour this over your cornflakes toss together to coat and sprinkle in your salt. Your crust should be about ready. While it’s still warm (and being careful, spread the jam out over the bottom of the crust.  Theb gently spoon over your sticky sweet Cornflake mix. Pop back in the oven for 5 minutes and bring out of the oven to set up. Leave this to cool and set further. 
I recommend a hot custard or my vanilla sauce to serve with this to send you into a complete food coma.  (You can find the recipe on my Peach blueberry crumble page).  However my friend happily munched on it without the next day and was more than happy with the effort ❤.

Baking · Dessert

Lazy Sunday Night in at it’s best 💛 Peach and Blueberry Crumble.

I am very much a Sunday kind of girl. I love Sundays. And this week, laziness was the game. Literally. Me, my book, the pool the sunshine and nothing else. Well, until I got hungry. Then comfort food was added to the agenda…

Crumble will always be one of my all time favorites, hands down ..and this one comes with the flavours of summer. Peaches are everywhere at the markets right now, from states further north. I love that my new home land is very proud of its produce and where it comes from. You’ll notice when you’re shopping, you’ll spot the potatoes are from Idaho, the peaches from Georgia or the Carolinas, the oranges of course from our very own Sunshine State. I’ve learned to appreciate these little details. And I’ve become very accustomed to it. 

Look at these beauties. Aren’t they stunning? 

You know they’re good when they’re half the size of your head and you leave a trail of juice behind you as you eat. They really should come with a sticky face warning though….
Anyway back to my crumble!   

My lazy day wouldn’t be complete without something sweet and delicious with as little effort as possible, et violà – I give you my crumble recipe. This just couldn’t be any easier.

This feeds 3ish- but can multiply easily. 
Base:

2 Peaches

1 Cup Blueberries

Topping: 

1 Cup Flour

1/3 Cup Oats 

1/3 Cup Oil – I used Avocado 

1/2Tsp Cinnamon 

1/3 Cup Organic Brown sugar.
Preheat the oven to 400°.

Chop your peaches into a 1.5 cm ish dice and mix in with your blueberries. Pop into a baking dish in a thick even layer. 

To make the topping pop the flour oats and oil in a bowl and mix until a chunky  crumbly texture. Then stir through your cinnamon and brown sugar. Tip this on top of your fruit. 

I hope you didn’t break a sweat. 

Pop this in the oven for 30minutes ish. Until hot and bubbly.

Optional Vanilla sauce : 

This basically is a mock up of a traditional custard. 

2Cups Almond milk 

2tsp Corn Flour 

1 vanilla pod 

Sugar to taste. (1-2 Tbsish)

Pop almond milk into a pan and stir in the flour whilst it’s cold. Turn the heat on low.

 Split the vanilla bean and slide a.knife along to get the caviar, pop that in the milk and then chuck the whole pod in too for extra flavour. Whisk this all in and continue to whisk the mixture until it has heated and begins the thicken. At this point whisk your sugar in too. 

Once nice and hot and thickened pull the vanilla pod out and you are ready to go. 

Ps. Cream or Ice Cream work here too. 

Dessert · Lunch

Naanwich! Yeah.. apparently that’s a thing.. 

Yeah so I was recently introduced to Naan bread sandwiches. And wow was I in love! And also felt a little odd that I’d never considered that as an idea before…

So here we have it. A spicy Harissa and maple roasted chickpea filling with piles of sautéed veggies, loaded on top of a cool creamy hummus loaded Naan. This is what nights in are made for.  For added sweet and spicy combo, I made a quick fresh mango dressing for on top and we were ready to roll!

This recipe makes 2 Naan sandwiches.

Maple Harissa Chickpeas:

1/2 Carton Chickpeas drained

1/2 Tsp Harissa paste

1.5 Tsp Maple Syrup

1 Tbs Oil of choice (I used avocado)
Sautéed Veggies

1/2 Courgette

1/2 Yellow Pepper

1/2 Red Pepper

Hand full of Asparagus

Oil of choice (you’ll be shocked to hear I used avocado again)
Mango topping :

2 Fresh Mangos

1/4 Chilli seeds removed and chopped finely (feel free to add more)

Juice of 2 limes

Honey or agave to taste

Salt
2 Naan bread.

OK so let’s start with the Chickpeas, pop the oven on 400 and pop the oil, Harissa and maple into a bowl with a big pinch of salt and whisk together. Toss the chickpeas in the dressing and roast for 20-25 minutes. Giving them a stair half way through.

The move onto the Mango dressing so it had a little time to sit. Chop up one mango into a small dice and peel the other and pop into a mini processor or blender add the lime juice, the chilli and a good drizzle of something sweet to the blender. Blitz and add a little salt to taste. Toss the chopped mango through this and set aside. Feel free to add some ginger or spices at this point too. If it doesn’t blend well add a splash of oil or water.

Next, chop up your veggies, I kept mine quite big for a nice bite.  Preheat a sauté pan over medium and sizzle those veggies.

For the last few minutes of cooking time, add your Naan to the oven to get nice and warm.

Now we are ready to assemble. I did I layer of cool creamy hummus on top of my Naan. You can grab some nice organic ones these days or feel free to whip up your favourite batch. Then I piled the veggies and chickpeas on giving a little drizzle of the thick dressing the chickpeas were in. Topped it all off with my mango and some fresh cilantro/coriander or parsley.

Dessert

Mango Lime Raw Cheesecake !

image

Ok. So aside from the horrific bad job on the Mango Roses, this turned out really nice. I was so pleased. It’s so summery and refreshing, a nice tropical hit in a regular cheesecake. Kept it plain and simple. Enjoyed a good few slices if this poolside this weekend !

Recipe:

Base :
1 Cup Pumpkin seeds
1 1/2 Cups Ground Almonds
1 Cup Medjool Dates
1 Tsp Cinnamon.

Filling :
1 Cup Brazil Nuts (Soaked overnight)
2 Champagne Mangos (only.just discovered that’s what they’re called ..the little yellow ones )
1/4 Oil (I used Avacado
1/3 Cup Sweetner (I used Honey )

Optional Toppings :
Lime, Mango and Fresh Herbs.

This couldn’t be easier. Pop everything for the base in a processor and blitz till it sticks together. Squish it in the base of a 8″ Cake pan. Pop it in the freezer.

Drain and rinse the Brazils then pop in the processor with the Honey and oil and blitz till its well broken down . Add in the flesh of the two Mangoes and blitz for a good while until it’s all smooth. Zest and juice  in the Lime give a final blitz and pour over the now cooled base. Freeze for 3-4 hours. Or over night. Lift out and give a little while to soften up a touch to serve!

Dessert · Uncategorized

Rhubarb Mini Vanilla Cheesecakes!

image

There’s so much fruit in season right now , it’s making me seriously happy ! Rhubarb , Blueberries , Peaches , Blackberries the list goes on. I love when everything is abundance and you can really play with them. I love keeping fruit as simple as possible specially when it’s an amazing quality and you just want to make it the star of the show. I wanted a quick and simple dessert that I could showcase all of this fruit on and a basic like plain Cheesecake appealed. Also , my love of all things mini kicked in and it made sense as then I could top them as I please! Besides I adore cheesecake in every form. These are entirely plant based and gluten free too.  This made 12 Mini Cheese Cakes but they were pretty small.

Recipe :

Base :
1 1/2 Cup Pumpkin seeds
10 Dates
1 Tbs Nut Butter or Tahini
1/2 tsp Cinnamon

Filling :
1 1/2 Cups Soaked Cashews (4 hrs min)
1/4 Cup Sweetner (Maple or Honey I’d suggest )
1/4 Cup Oil (I used a palm , organically and responsibly sourced )
1/4 Milk (I used Almond but I think rice would work too  )
1 Tsp Vanilla paste
(Optional 1/2 Cup of Almond yogurt -makes them lighter but not necessary )

Topping : options
Stewed Rhubarb
Fresh Blueberries
Home made Blueberry Jam
Peaches
Stewed Peaches
Fresh Blackberries
Mixed Berry jam
Whatever is in season.

Pop all base ingredients into a processor and blitz into a dough when (you squish it it should stick together ).

Pop these into the bottom of your cases. I really recommend loose bottom or silicone moulds just to get them back out ok. Squish them down firmly and pop in the freezer. While you make the filling.

For the filling ,  drain and rinse the Cashews and blitz into a nice creamy consistency in the processor. Once it’s all smooth pour onto your now cold bases. Let them freeze for 40 minutes to an hour whilst you make your topping.

image

For ours I cooked a cup of chopped Rhubarb with a little fructose sugar and water and brought it to a simmer for 10 minutes. Let that cool and piled it high.

image

I only top a few at a time, the Cheesecakes will keep for a week or two in an air tight container in the freezer … mine never last longer than that anyway ..too many sweettooths in this house !

image

Dessert

Banana Pops!

image

It’s getting warm here. Like lazy day by the pool weather. My favourite kind of weather. Not the intense scary hot of Florida Summers but that lovely build up.
So to expand my repertoire of poolside delights , something cold and sweet was on the cards. I know Banana pops are nothing new. But I love these. And they always seem to hit the spot and stop me from some major food envy whist everyone else tucks into fancy Icecreams!
I made these two different ways this time , but to be honest the combinations are endless. You can choose the dip, the nuts, go all fancy and add dried fruit. Really the choice is yours. But these are this weekends options and I hope you like them! I may add more as I go. Another favourite of mine is Almond Butter and Honey dip with Tart Cherries. I’ll snap them and add them next time I make them.

image

Recipe :
2 Bananas
1/3 Cup Carob
2 Tbs Nut Butter
1 Tbs Oil/ Shorting Melted  ( I have an organic shortening thay works really well to set carob )
Almond Milk
1 tbs Maple Syrup ( or other sweetner )

Toppings : Pecans( chopped ) , Nut Butter , dried fruit , baked Buckwheat.

Pop your Bananas on sticks and put them in the freezer. I usually put them on a silicone baking tray.  Leave these 3-4 Hours to freeze ( or the night before –  I tend do make a batch of these then just store them in a bag in the freezer for when I want to dip them).

Once they’re frozen , add all other ingedients to make a pretty thick dip. Thin it with a little Almond milk if its too thick to dip.

Dip or drizzle away. Then roll in your selected topping. Pop back on the tray into the freezer for 15 minutes jusy to set.

image

Baking · Dessert

Linda’s Black Bean Carob Brownies with Tart Cherries

image

My friend Linda came to visit me today. What a great lady, she’s always been very supportive of my cooking and you can blame her for this blog (haha). But on a serious note , I’d like to give her a big Thank you! Linda and I have alot in common but one thing on the cards to day was our allergies !  You could write a book between mine and her allergies ! So I wanted something that was a treat for both of us something sweet to catch up over , but still safe too. It had to be Dairy  Egg, Coconut and Chocolate  free for me, and no Grains and not too much Sugar for Linda. I’d spotted a grain free brownie recipe in a new cook book I had. So now it was time to adapt it to me too and I was more than happy with the results , accomodating us both was a tall order ! But here we have it. Fudgey, Carob Brownies. With a little kick from some Tart Cherries. I have Linda’s approval that these are a winner. I hope you like them too !

Recipe:
1 Pear
1 Carton Black Beans
1 1/2 Cups Ground Almonds
1 1/2 Cups Milk of choice (I use Almond)
1 Cup Carob Powder
1/2 Cup Sweetner – Honey or Maple work best here.
1/3 Cup Ground Flax seed
2 Tbs Oil (I used Avacado)
Sprinkle of Salt
1/2 Cup Dried Tart Cherries

Optional drizzle :
1 Tbs Maple Syrup
1 Tbs Carob
1 Tbs Hot Water.

Preheat oven to 350°. Line a 9×9 tray with Baking Paper and give it a good spray with oil.

Remove the Seeds from your Pear and pop it in the processor. Drain your Black Beans and add them too. Pop in your ground Almonds and Milk and blitz into a paste. Then add your Carob , sweetner Flax , Salt and oil. Give the processor another blitz. Then leave it to sit for 10 minutes. It’ll be pretty thick but this time just gives the flax it’s opportunity to bind everything.

After it’s resting time, pour into your Baking Dish. Then I poked the  Cherries into the batter lightly. But if you want to stir them in first go ahead.

Pop into the oven for 40 minutes or until set. It takes a good while so keep checking. They will still be squishy and fudgey though so don’t panic.

Leave them to cool in the dish completely before lifting out and cutting.. (It helps them firm up a little more.)

Once cooled I cut these up and drizzled with a little Carob and Maple syrup watered down. But that is completely optional as they were great without too!

image

Piled them high and they were ready to go!

And a lovely afternoon catchup with a good friend really made my day !